Tag: Absolute Stainless

Brilliant Day In Whangarei

We’ve spent months preparing Dazzler for our upcoming journey from New Zealand to Fiji and two an a half years waiting for this time to finally arrive. There’s no doubt we are definitely ready to move on but before we cast off our lines and say our final goodbyes we decided we needed to spend one last brilliant day exploring Whangarei.

Living in this town of around 90,000 people has been quite the experience for both of us. First of all, we never meant to have it feel like home, rather more like an extended vacation spot. Of course the “Vid” had other plans for us and, quite frankly, that’s okay. If the recent pandemic did anything good it gave us an opportunity to get to know New Zealand in ways many Kiwis never will.

It also gave us the opportunity to really get to know the little gem known as Whangarei. Whangarei is a quaint and diverse little city with a lot of culture and beauty. She’s got dazzling parks, walking and bike trails that skirt the fabulous basin as well as traverse lush forests filled with waterfalls and giant Kauri trees. There’s some fabulous restaurants and pubs, a little shopping and just about everything a yachtie could need in terms of tradespeople and supplies.

Comprised of approximately 70% Europeans, 25% Māori and 5% other nationalities such as Pacific Islanders, Asians etc…we’ve found the people here to be truly fantastic. They are kind and most will go out of their way to help you with whatever you need. Yes, living here for the past few years has been a wonderful experience. 

So, on this, our final full day in the area, we’ve decided to spend our time visiting our favorite haunts as well as the brand new Hundertwasser Museum that we’ve watched being built here in the Town Basin. Yes, one last walk around town just to soak it all in before we cast off our lines and head to Marsden Cove to await our weather window.

The Rolling Ball Clock

One thing we love about Whangarei and New Zealand in general is their amazing use of outdoor spaces. The parks and walkways in and around the cities are truly special. Here in Whangarei they seem to have this obsession with clocks. There’s the Clapham’s Clock Museum behind the marina office that has a giant sundial in front of it.

Atop of the marina office is the black time ball time keeper where each day at noon the ball slides down the spire. It is a symbolic connection between the area’s maritime history and its maritime future, as represented by the cruising community on the Hatea River.

And now, there’s the new About Time Rolling Ball Clock right beside the playground and clock museum. Now this clock is actually something to see. It took 14 years to come into existence. The last two of which were the actual building and trial phase. The folks over at Absolute Stainless built it and it is truly fascinating. This “rolling ball” kinetic sculpture sits inside a glass enclosure that is topped with an stainless steel waved roof.

The sculpture is comprised of 35 “bowling balls” that run along stainless steel tracks. In one corner you have the the sculpture of a female peddling away. As she peddles the balls are lifted up a chain elevator and then dropped onto various tracks. They roll, twist, turn, do loop the loops, banked curves and more. Eventually the balls land on time teeter totters. There is one teeter totter that illustrates the hour, two for the minutes and one for seconds.

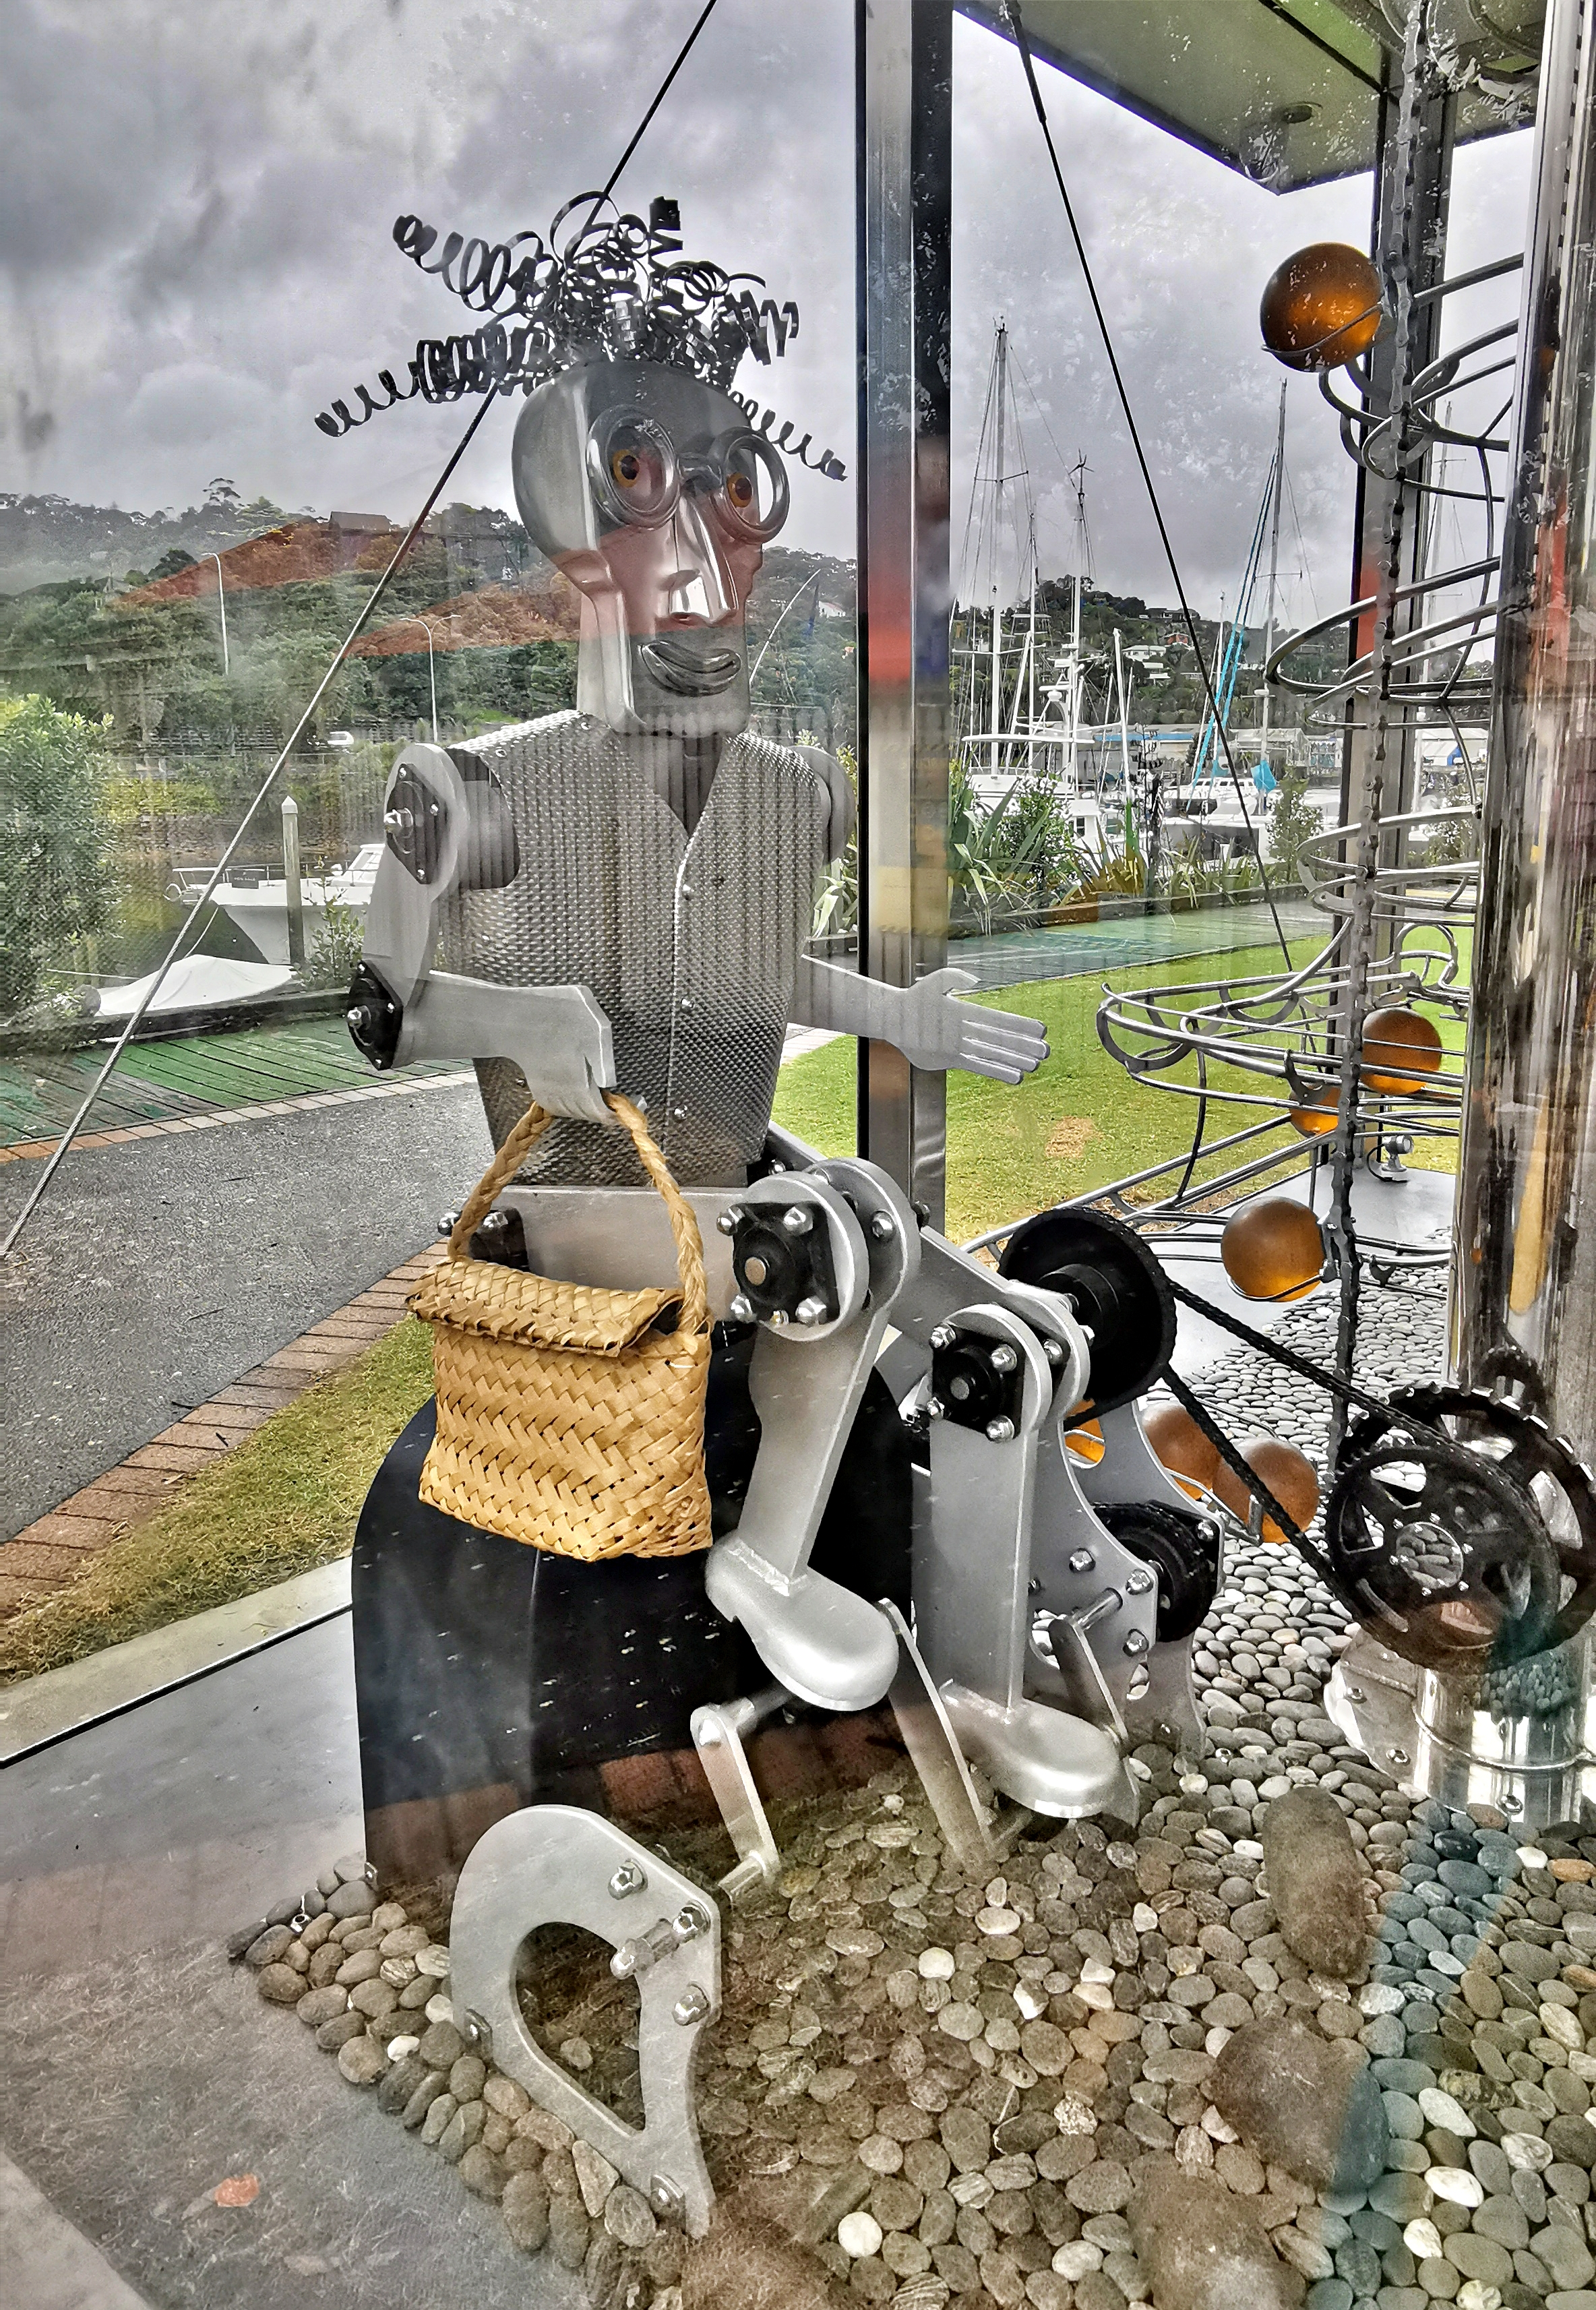
By looking at the balls in the trays you can tell the time. It’s really very fascinating to watch. I could literally sit there all day watching it. Click here to see a live feed of the clock in action.

A Tasty Treat At The Butter Factory

A cold beer at Split is a great way to waste a little time.

Next we were off to the Butter Factory for some lunch but we arrived a tad early so we ended up stopping at Split just around the corner where we had a beer and bought some time. We have enjoyed eating here too as they have great salads and incredible wings but my favorite meal in all of Whangarei is at the Butter Factory and if I am going to enjoy one last meal in the area then it’s got to be there. 

The Butter Factory has become a true favorite of ours for the historical building, great staff and truly amazing food. Built in 1905 this building was actually used as a butter factory; hence the name. The stone floors are uneven and sloping reminding you that this is a very old building. Constructed of basalt blocks (volcanic rock blocks) and huge wooden beams made from Kauri trees this place reminds me of the inside of an old European castle. There’s a wonderful outdoor patio area that’s under cover and they even have a stage where they host bands on the weekends. 

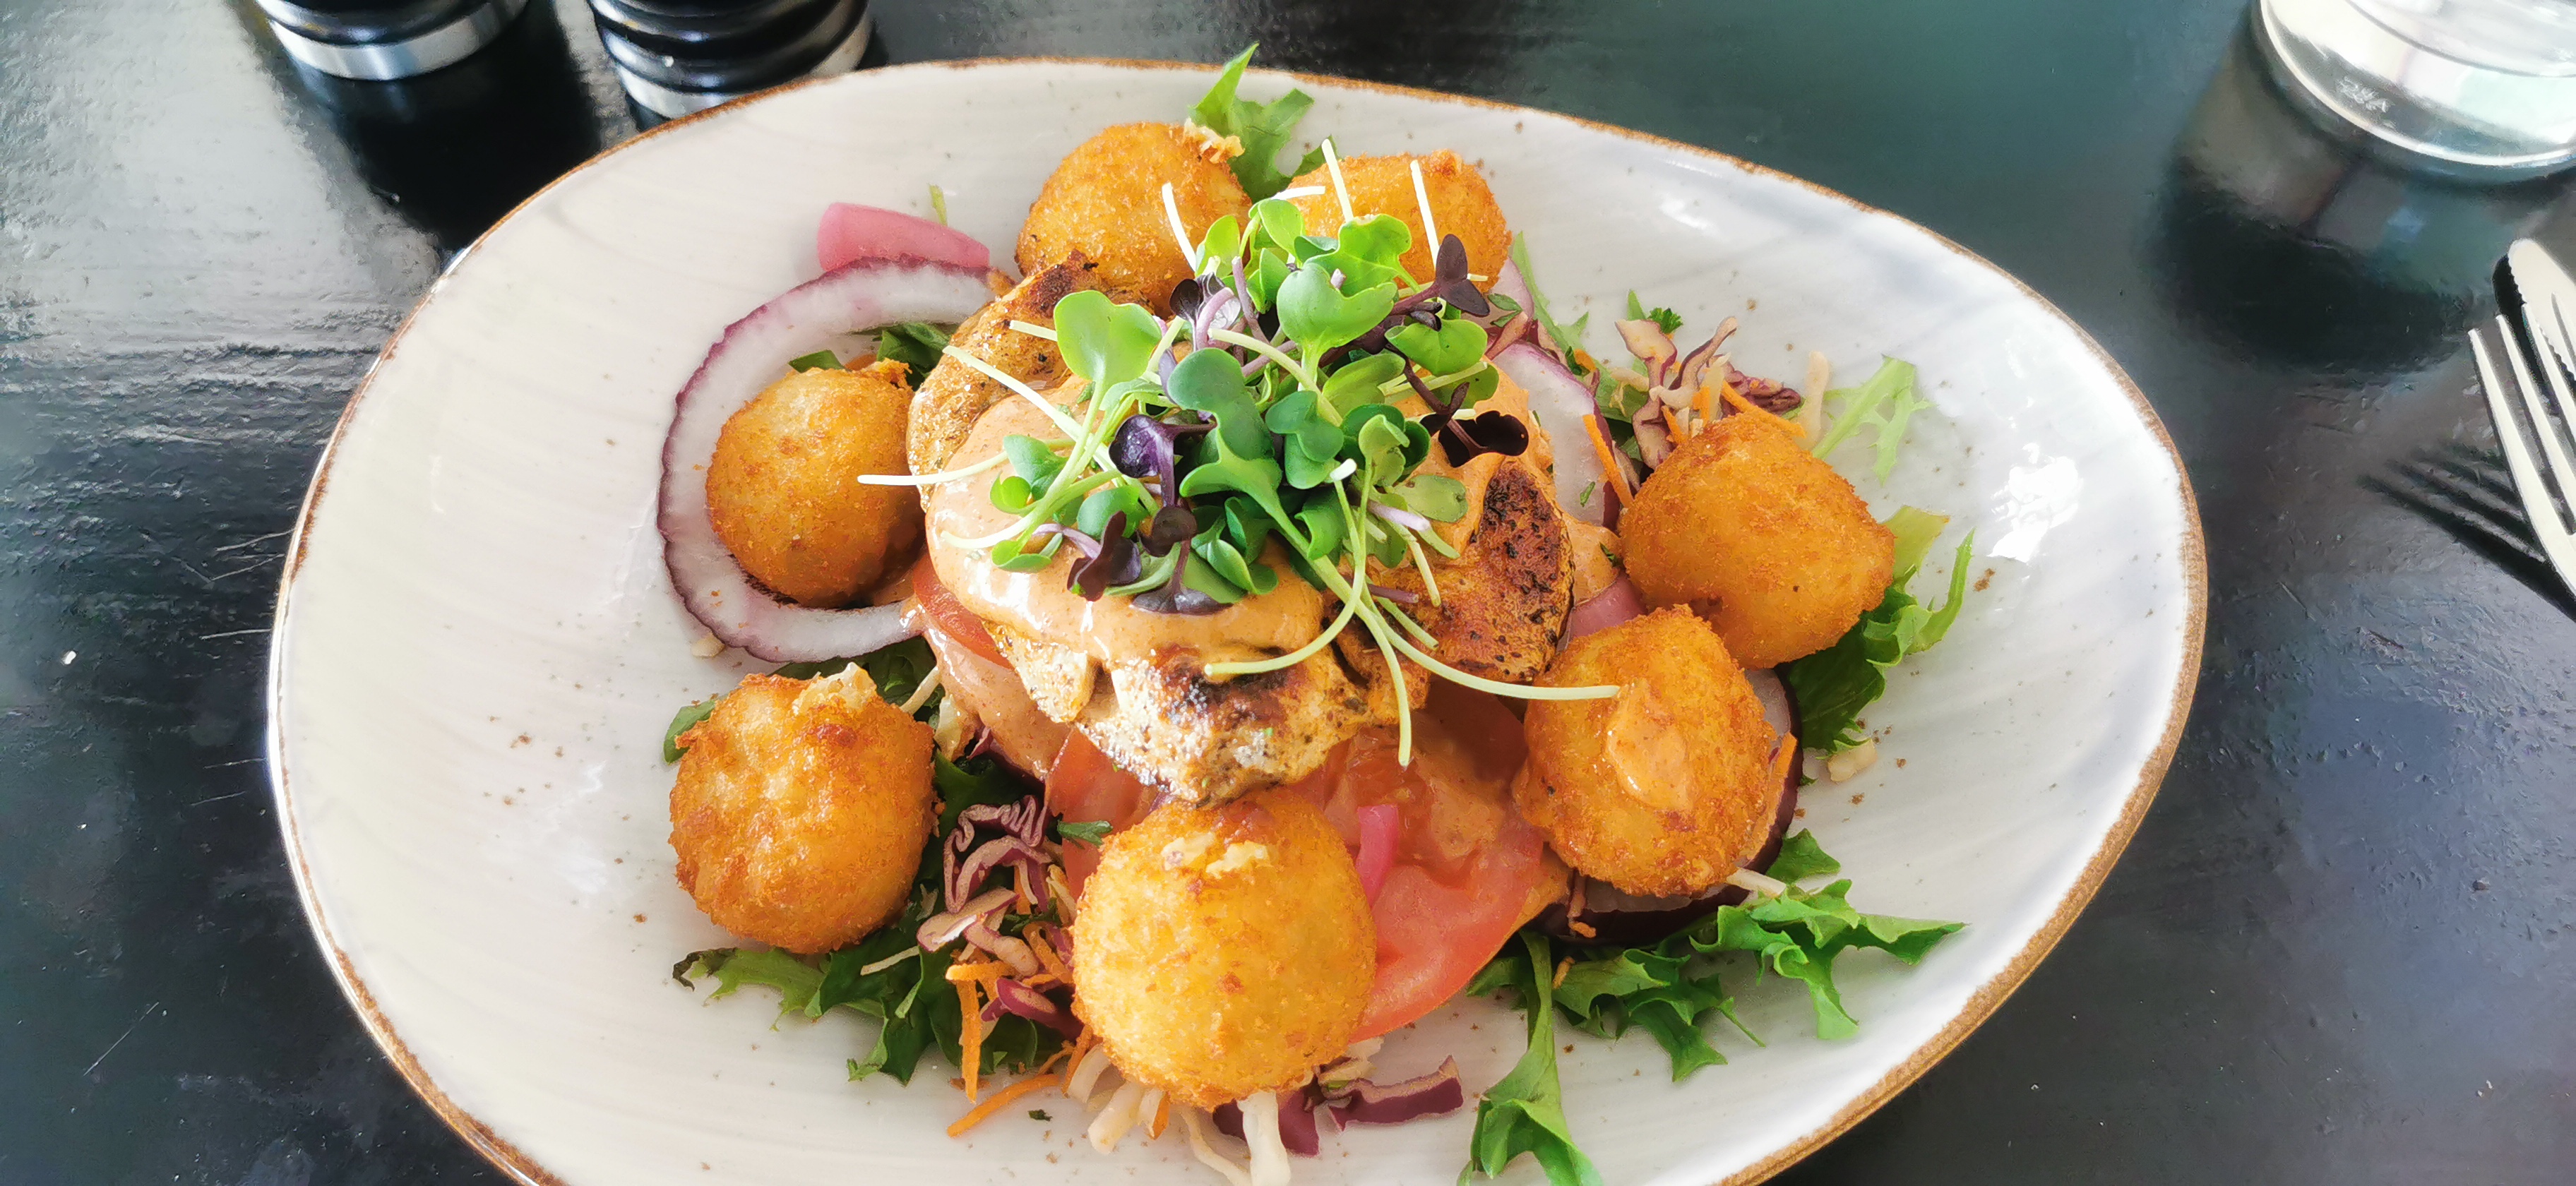
Today it’s a bit rainy out but it’s still warm enough to warrant sitting outside. We arrive early enough so as to beat the lunch crowd. I’m nearly drooling just thinking of the meal that I’ll be having. For me, my favorite is the spicy chicken sandwich but I opt to forgo the bread so they put the spicy chicken on a bed of greens and then drizzle chipotle mayo over it. Around the plate they scatter a few jalepeno poppers. It is sooooooo good!

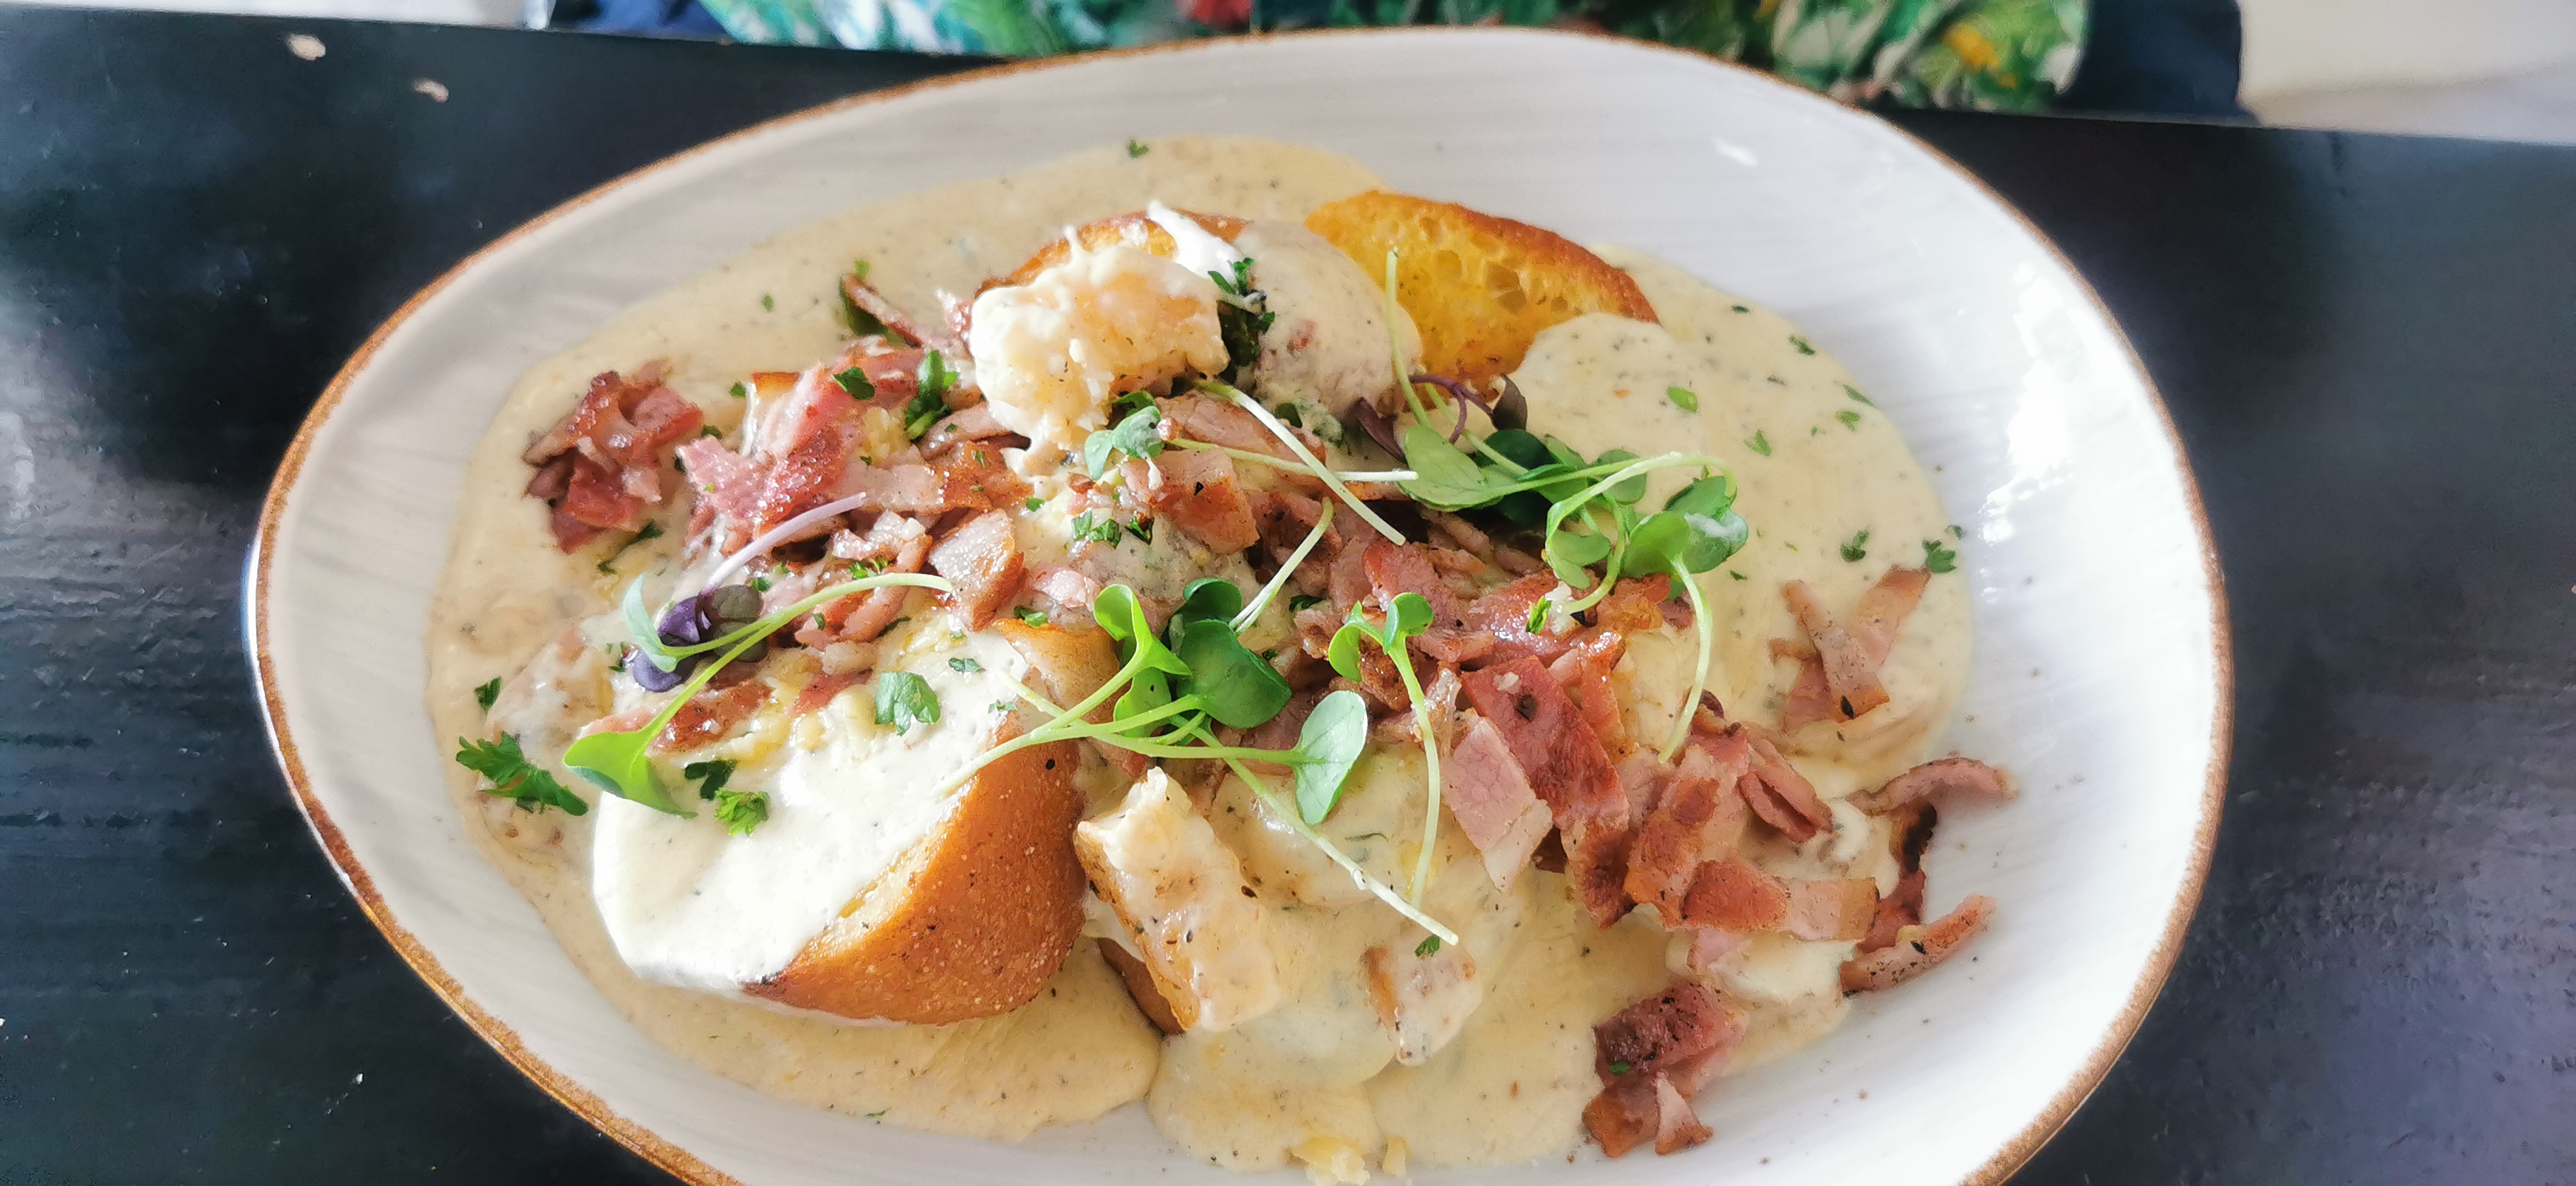
For Dan, it’s the creamy garlic prawns over garlic bread, topped with cheese and bacon. I think we’ve both had the exact same meal the last dozen times we’ve been in here. And, honestly, that’s a bit crazy because they have so many other fabulously tasty dishes to choose from. In fact, if you ever get here you should try their Butter Burger. This sandwich is epic with slow cooked brisket, a cajun chicken breast, slaw and a deep fried pickle. I mean really….it’s a meat lover’s dream and it’s loaded with flavor. 

As expected they did not disappoint. We enjoyed our last meal here chatting with the staff who we have come to know quite well. Our feast here was one to be truly savored. When we were done the staff wished us a fond farewell as we headed out for our next stop.

No Straight Lines

A short walk back through town and we arrived at the newly opened Hundertwasser Museum and Art Centre. Now, to fully appreciate this place you really need to know a bit about Friedensreich Hundertwasser. He was a famed architect, artist, painter and true friend of the planet. Born in Vienna, Austria in 1928 it wasn’t until he was fifty-five years old that he started designing buildings. Prior to that he was a painter and artist. 

If you look closely you will see the grounds around the building are undulating

As you can see from the building here in Whangarei he was one who detested straight lines. Even the floors in and around the museum are undulating. He once said, “rolling floors are a melody to the feet”. He thought flat floors were unnatural and disconnected humans from the earth. He actually believed straight lines were evil and the downfall of humanity. Yes, he was the typical oddball artist. But, that said, he did create some very interesting paintings as well as thirty-five buildings around the world that are absolutely fascinating.

Hundertwasser moved to New Zealand in the seventies and purchased some land where he could live off grid for the most part. In Kawakawa, a town just outside of Opua, you’ll find the Hundertwasser Toilets. Yes, I said, “toilets”. We’ve been by there but never could go in because it was undergoing a giant reconstruction. The toilets were commissioned by the local council as a way to grab some tourists on their way up to Opua. 

Unfortunately he died at sea in 2000 and was not alive to see the museum here in Whangarei or the beautiful park that was created around it. Having watched the construction here over the past three years we weren’t going to leave until we took a stroll through it. So, after lunch we decided to take a look.

In the bottom floor of the museum there is a Māori exhibit which, sadly, we found to be of little interest. There are so many talented Māori artists in this country and the handful of exhibits in this room were quite frankly, just not very good. We’ve heard that the reason for this is that with the Covid delays in construction many of those who planned to exhibit their pieces here pulled out and put their work in other museums so hopefully as time goes on this exhibit will get better.

The second floor houses a restaurant called Aqua. We haven’t eaten there but we did stop in for a pint not long after they opened. The view across the marina from the outside tables is lovely but quite frankly the menu just doesn’t appeal to us. With things like rabbit ribs and Vietnamese omelettes filled with shrimp, crispy pork and peanuts or oysters at $5 NZD a piece, this just isn’t a place we decided to try. But, if that’s your thing then you’d probably enjoy it and you’re sure to love the views. 

The third floor is where the interesting paintings and artwork of Friedensreich Hundertwasser are on display. As I said, he’s a bit out there….sort of like Picasso in a way, so the paintings were a little strange as well but, nevertheless, they were interesting to view. He had a very energetic style filled with lots of color.

One of Hundertwasser’s signature elements in buildings is the living rooftop and this museum is no exception. In fact, this building hosts the largest living rooftop in the Southern Hemisphere. 540 cubic meters of soil were lifted to its rooftop before the plantings arrived. 

The Golden Tit of Whangarei

From the roof you can see all of the basin and the town of Whangarei. On the northeast corner of the roof there is, as Dan affectionately refers to it, the Golden Tit of Whangarei. It’s the 3.5 ton cupola that crowns the tower and it’s actually covered in $50,000 NZD of real gold leaf. 

What’s really interesting about this is that tile layers were tasked with abandoning what they know about tiling to create something truly different. There is not a single straight line of tile or brick in the entire place! Workers were given creative freedom to do what they thought fit the building. Some added Māori style artwork, others paid tribute to Hundertwasser himself and still others saluted the sailing community. In every corner there’s something unique about the structure.

All this said, you can see the museum in about a half hour…maybe an hour if you really take your time. The entrance fee is $21unless you are a local resident. Honestly we felt it was a bit high for what you got but I guess they to find some way to recoup the $33 million they spent building it. As Dan said, the place is really about the building itself and, well, you can see that all day for free. Anyway, we’re happy we took the time to stop in before we left.

It’s A Wrap

Frings Button

After our stop at the museum we needed to stop by Frings to pick up our personalized beer mugs and, of course, have one last beer with our friends there. There weren’t many people there as it was still early but it was nice to see Haydz one last time. 

As we strolled along the quay looking at the restaurants and shops, watching the kids play in the new fountains and on the playground I felt as if we were saying goodbye, not only to the people here in Whangarei but to an entire way of life. Don’t get me wrong, I’m ready to move on but this place will always be very near and dear to my heart.

We took one last photo on the Victoria Canopy Bridge where we were married and from there it was back to Dazzler to prepare for our departure the following morning. 

Until next time, 

Jilly

Chainplates, Service For Six

In the world of living on a sailboat and traveling or rather being stuck in a place due to pandemics, plagues, meteor showers and locust, we wear many different hats. Some days we wear the Captain’s hat. I like those days! Some days it’s a cook’s hat or even the mechanic, plumber, marine electronic engineer, or even the bottom cleaner hat. One thing is for sure, You don’t have to worry about having a locker full of shoes because that locker is filled with all the bloody hats you have to wear.

I think someday I’ll invent a catch all hat that will just about do all the different tasks. Perhaps it will look like the old service station white paper hat that the man with the star used to wear along with that chipper attitude to want to provide you with the best service possible. Nope! It will more than likely be something with a built in LED light in the front to help you see what you are working on in those dark corners of the bilge. Whatever it looks like, at one point you have to deal with chainplates. Service for six please. Yes, I said it.

At some point during the life of your sailboat the question regarding chainplates will become important. Either your suspicious nature of old equipment that’s installed on your boat or things that are unseen or perhaps your insurance company may want a survey that describes the condition of your chainplates. Well, we fall into the first category.

Over the last year, I have noticed a suspicious rust stain on the teak cap rail gradually increasing in length. Dazzler’s 34 year old chainplates are original. She has three main chainplates on each side of the hull. By design they were installed along the inside of her hull where they had been epoxied and fiberglassed to the hull. These chainplates are about 1/4” thick stainless steel material. There are three ½” slotted round head machine screws that pass through the hull and chainplates to an interior nut to keep them from being pulled upward. The top of each chainplate stands proud through the teak cap rail where the shrouds are then attached.

Additionally, each chainplate has a small stainless steel plate that is mounted to the top of the cap rail where the top protrudes for shroud attachment. The chainplate machine screw anchor nuts are located in interior lockers and have a cute little teak box covering them. Isn’t that nice? Once removed, there is a small access area to each nut. The nuts have also been epoxied and fiberglassed over making it near impossible to inspect the condition of the nuts without cutting away the epoxy. The upper nut in each locker is only accessible after you remove the headliner in each locker and then the furring strips that the head liner is screwed into.

As you can imagine, inspecting the full length of each chainplate for corrosion without tearing out a large section of the interior lockers to gain access is WAY more than the experience of my wheelhouse. Sure I could tear up anything if I didn’t intend to have a nice finished job when completed. No, I acquiesced to believing that the 34 year old chainplates had served their usefulness and new chainplates should be installed. That will take away the guessing game of what if and might even make an insurer happy. Who knows?

What to do? Do we try to rip those old chainplates out of the hull and cause even more damage to repair or go to the local stainless steel shop of cosmetic boat augmentation and have some bolt ons made to enhance the beauty and the structural integrity of mast securement. Dazzler’s going to get some shiny new bolt ons. Lookout buoys!

Having made a decision of how to proceed I knew I needed to make some kind of template for the new chainplates. I also needed to design some kind of template for the profile of the hull to have the new plates bent and shaped to fit her hull.

And So It Begins

The first challenge came in the form of the teak cap rail, trim rail and rub rails that had been secured to Dazzler’s side. Sections of the rails would have to be removed not only for installation, but for facilitating accuracy of making the templates.

For the teak cap rail I used a Dremel Multi-Max oscillating tool with a 1” plunge cutting blade. I first used an angle tool to draw 45° lines as a guide. Once they were cut I then used the surface of the hull side as a guide to make a plunge cut upward. The piece of teak removed in one piece was saved to later finish off the rail at the completion of the new install.

The teak trim rail wasn’t too difficult as there were teak bungs covering stainless steel wood screws that were used to secure it it place. I made two 45° plunge cuts one on each side of the chainplate area I would be working on (about 6 feet long). I then drilled a small hole in the center of the bungs and used a screw to help extract the bung. Then I had to use mechanic picks to tap and chip out the hardened epoxy that had filled the top of the screw heads so I could use a screwdriver to remove the screws.

Next was the teak rub rail that is about 1.5” x 1.5” rounded rail. It also had teak bungs covering screws. On this rail I made approximate 60° angle cuts and I made them sweep aft like scales of a fish. However! The screws hidden beneath the 1/2” teak bungs had a larger head. Hummm! What could this mean? Well, I had to use an old manual style hand held impact driver with a bigger hammer to remove them. As the threads of the first screw revealed themselves it was obvious that it was a machine screw. Which also meant that there were some kind of backing nut on the inside of the hull. Hummm!

Needless to say these 34 year old machine screws appeared to have a ¼ x 20 thread and some surface corrosion. As I’ve said before all boat projects are a broken bolt away from a three day adventure. Guess what? This was no exception. Two of the ten machine screws didn’t want to be removed. It felt like the nut was turning on the inside of the hull. I might interject here that the inside of the hull is covered with a nice teak panel on the inside of each locker to give it a finished look. Lovely! This paneling nicely concealed any and all backing nuts adding a great new treasure hunting game to the equation.

I once again employed the usefulness of the Dremel Multi-Max to plunge cut through the middle of the teak rub rail to cut off the head of the two wayward machine fasteners. I’ll add some epoxy to those slits after I reinstall the rail. Off came an approximate six foot section of rub rail. Wow! This was just the starboard side.

I detuned the standing rigging so as not to put much stress on the existing chainplates. Wouldn’t want them to slip up out of the 34 year old hardened epoxy or fiberglass by accident.

Making The Templates

After cleaning up the hull from destruction I set forth to make my templates. I first used some brown shipping paper to tape to the hull to mark the location of the three 1/2” mounting holes for the new plates. This was easy enough. I had to also marked the location of the possible bends to help index where the holes would be located in relation to the top of the cap rail.

With the paper template complete, I overlaid it and taped it to a piece of cardboard that I had cut in a two inch strip about three feet long. I then used a ½” hole punch from my canvass tool bag to make three nice holes through the cardboard where the holes were located. Once the holes were completed I installed the cardboard template to the hull of Dazzler using the three ½” machine screws. The holes lined up perfectly.

I then marked where the hard angle bends should be on the template. Next I had to start making a profile template for each plate. This was a little more difficult. I obtained a ¼ sheet of 3/16” MDX particle board from the local wood supplier. I first used some cardboard to make a rough curve of Dazzler’s hull. It was easier to use scissors or a utility knife to trim and shape. Once I felt comfortable with the shape I transferred it onto the MDX and used an electric saw to cut to shape.

The aft chainplate has two shrouds attached at its top and would need to be almost twice as wide. I did choose to taper the lower section of the new designed template.

The process of making the templates took about a half day for each side. The most interesting thing I discovered during the process is that the machine screw hole pattern for each chainplate mirrored the chainplate on the opposite side. So, the fore port and starboard chainplate holes were exactly the same pattern. It was also the same for the mid and aft chainplates on each side. Additionally, the hull profile templates were the same as well, except for the aft chainplates. I had to make an additional profile template unique to each side.

Getting The Chainplates Made

With our templates made we were off the a local vendor Absolute Stainless located here in the Whangarei area. They came recommended by a local rigger. Upon our arrival I met with the managing director, Simon Mehrtens. We decided to have the new chainplates made from 10 mm 316L material. Simon would have to make a CAD drawing of our templates to send to a CNC company in the Auckland area. About five days later our raw chainplates were back at Absolute Stainless were they would be shaped, polished and then sent to be electro polished.

I did request to pickup the chainplates prior to being electro polished to dry fit them before being sent out. While dry fitting the new chainplates onto Dazzler’s hull I found that two of the chainplates shapes would have to be tweaked a little. Off to Auckland again.

During the downtime I made good use of my time by removing the interior chainplate nuts. I used two different techniques, however, the best technique was using a bi-metal hole saw. This not only opened up access to the chainplate nut. It also cut the old epoxy and fiberglass in a nice disc shape down to the old chainplate. This epoxied disc, including the nut popped right off exposing the surface of the old chainplate. I then used a disk shaped polisher attached to my drill to clean up the surface of the old chainplate. I also made it easier to access the upper chainplate nut without removing the headliner by increasing the access hole of the headliner and furring strip.

About five days later the new chainplates were ready for pickup. Two of the plates still needed a little more tweaking before they could be installed.

I obtained a supply of ½” x 2” bolts for the install from Anzor here in Whangarei. However, I did need to get about six 2 ½” bolts for a few holes because the upper bolt holes had a bit more fiberglass and were a bit thicker than the lower two.

Removing The Tangs

The old chainplate tang that protruded out of the top of the cap rail had to be removed prior to installing the new chainplates. I used an angle grinder with a small diameter stainless steel cutoff blade at about 45° angle to cut the tang off below the cap rail. This process seemed to be the easiest way to remove the old tang. Once it was cut off, I did a little grinding to ensure it was below the top of the cap rail. I marked and chiseled out a rectangular area around the old tang. I also dug out all the old caulking material that had been used over the years. I partially filled the void with West Systems G Flex Epoxy. I used some ¼” teak material to cut a piece to fit into the opening. Again I used some G Flex Epoxy to fill up the rest of the void and fasten the piece of teak in place. The next day I chiseled away the excess and sanded flush. Because I didn’t want to remove all the shrouds on one side of the mast at the same time, I worked on no more than two shrouds at a time.

Installing The Chainplates

I used 300 ml tubes of Sikalastomer 511, which is mostly a flowing butyl material which is waterproof and water vapor proof. Additionally, I used Sikaflex 295 for the area of teak that the chainplate would cover. I also used butyl tape to wrap each bolt and make a separation line between the 511 and the 295.

To recap up to now, the new chainplates were attached with the following results. The old ¼” stainless steel chainplate fiberglassed inside the hull was used as a backing plate. The fiberglass hull was sandwiched between the backing plate and the new chainplate bedded with butyl material and fastened with ½” stainless steel bolts, washers, lock washers and nuts.

Note that I’ve tied the chainplate to the rail while I work with it. The last thing I wanted to do is have to go diving for a new chainplate!

Once the chainplates were all installed on one side I began cutting the trim teak to fit. The rub rail had to be notched out to fit over the top of the lower section of the chainplates. Remember the two screws that had to be cut off earlier. Oh yea. Well I did some careful measuring and located them inside the coat locker. I had to use a hole saw to carefully cut through the wood liner to expose the backing nuts that had somehow become detached and then remove the old fastener.

Now back to the rub rail. I used butyl tape around each of the machine screws and 511 caulking for the length of the rail. One screw at a time the rub rail slowly pulled into position with its three notch outs over the new chainplates. Once the last screw was in place it looked great. I cleaned up the excess butyl and was now ready to tackle the other side.

The last thing was to use those cap rail cut outs that I mentioned earlier. I had marked them as to where they had come from for easy identification and I cut off the tips to reattach to the cap rails on each side of the chainplates to give it a nice finished look.

Statistics

About 75 hours of labor. This included running around town chasing supplies and the actual labor

5 tubes of Sikalastomer 511
2 tubes of Sikaflex 295
One roll of butyl tape
18 – ½” x 2” and 2.5” stainless steel bolts, washers, lock washers and nuts
Stainless steel screws
Teak plugs ¼” and ½”
Three rolls of paper towels
A handful of straight razor blades
Acetone
Cloth rags
Rust Killer
Back brace…Ha Ha
3 Chiropractor visits…Ha Ha
Bandaids (Even louder laughing)
Several Disposable nitrile gloves
One roll of 1” blue 3M tape
A pack of Dremel sanding pads
3 stainless steel angle grinder cutting blades
One piece of flesh lost to the short fin eel that nibbled on my foot while it was dangling in the water off of the edge of the dock whilst working during the project.

Must have and nice to have tools for this job

Drill and assortment of bits
Hole saw blades
Screw extractor bits
Sharp hand picks for removing pieces of teak plugs and encrusted bits of epoxy imbedded in the fastener heads
Angle grinder
Hand held impact driver
Hammer
Bigger hammer
Biggest hammer
Telephone number and address of local Chiropractor
Miter box and wood saw
Cardboard and paper for making templates
Precise measuring tools
Angle measuring device
Oscillating tool for making small plunge cuts
Bi-metal and carbide tipped cutting blades
Countersink bits
Hand scrapers
Plastic and metal spatulas
Wood chisels
Screw drivers
Assorted wrenches and sockets
Lots of patience

Dazzler ended up with some beautiful new boat bling that is super strong and ready for the big blue ocean. I ended up with a lighter wallet, aching back and a huge sense of accomplishment. I was rewarded with a cigar and a couple of nice glasses of scotch in my awesome new Norlan scotch glasses I got for Christmas. I’d say it was a huge success!

Cheers,

Captain Dan

Resource and businesses used:

www.AbsoluteStainless.co.nz

www.Anzor.co.nz

www.scootersply.co.nz